Deploy a Mumble Voice Server in 2 Minutes — No Port Forwarding, No Problem
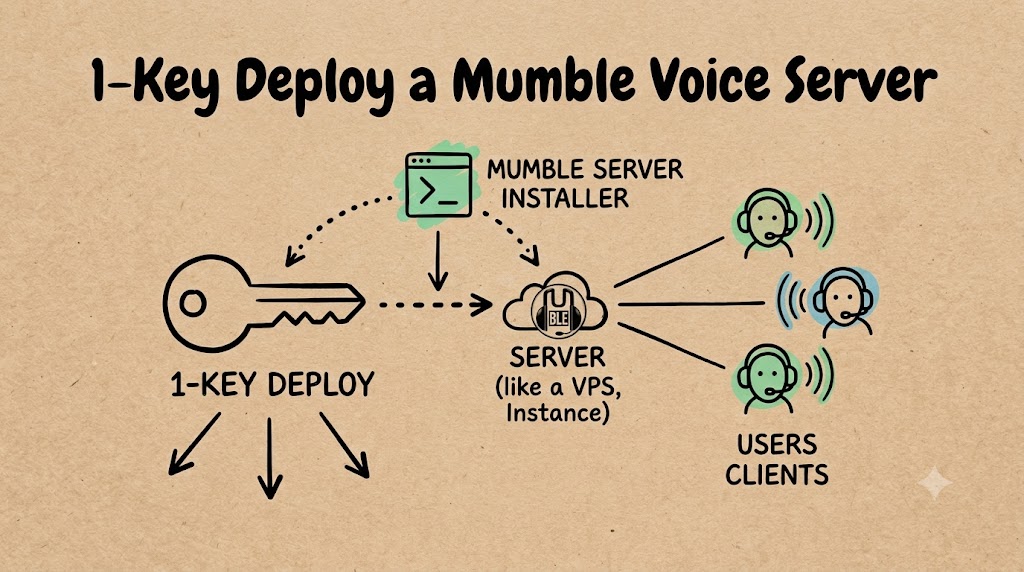
If you’ve ever tried to set up a voice chat server for your gaming group, remote team, or open-source community, you know the drill: rent a VPS, SSH in, install packages, configure firewall rules, wrestle with NAT port forwarding, set up SSL… and then pray it stays up.
What if you could skip all of that?
Mumble has been the gold standard for open-source, low-latency voice chat for over a decade. It’s the go-to for competitive gaming communities (EVE Online alliances with 100+ simultaneous voice users swear by it), podcasters who need multi-channel recording, and privacy-focused teams who don’t want their voice data living on someone else’s servers.
And now, with Railway, you can deploy a fully functional Mumble server in about two minutes. No terminal. No DevOps. Just click and talk.

Why Mumble?
Before we get into the deployment, let’s talk about why Mumble is worth your time — especially when Discord is free and everywhere.
Low Latency — Like, Actually Low
Mumble was the first VoIP application to nail true low-latency voice communication over a decade ago. While Discord typically sits at 50-100ms of latency, Mumble consistently delivers sub-20ms. For competitive gaming where callouts need to land now, that difference matters.
Privacy by Design
Every Mumble connection is encrypted end-to-end by default. There’s no “trust us” involved — it uses public/private-key authentication out of the box. Your voice data never touches a third-party server you don’t control.
Self-Hosted = Your Data, Your Rules
When you run your own Mumble server, you own everything: the channel structure, user accounts, access control lists, and most importantly, the data. No analytics, no data mining, no “we’ve updated our privacy policy” emails.
Resource-Friendly
Mumble’s server (historically called “Murmur”) is incredibly lightweight. We’re talking about a service that can comfortably handle dozens of concurrent users on minimal cloud resources. You won’t need to upgrade your plan just because your community grew.
Deploy in 2 Minutes: Step-by-Step
Step 1 — Click Deploy
Head to the Mumble VoIP Server template on Railway and hit Deploy. That’s it. Railway pulls the official mumblevoip/mumble-server Docker image, provisions a container, and binds the necessary ports automatically.
If you don’t have a Railway account yet, sign up at railway.com — you’ll get free $20 credit to get started.
Step 2 — Grab Your SuperUser Password
Mumble auto-generates a secure SuperUser password on first boot. You’ll need this for full administrative control over your server.
Here’s how to find it:
- Click on your Mumble service in the Railway dashboard
- Go to the Deploy Logs tab
- Find the earliest deployment
- Look for a log entry like this:
2026-06-29 02:35:00.000 => Password for 'SuperUser' set to 'xyzAbCdEfGh'Copy that generated password. The username is literally SuperUser.
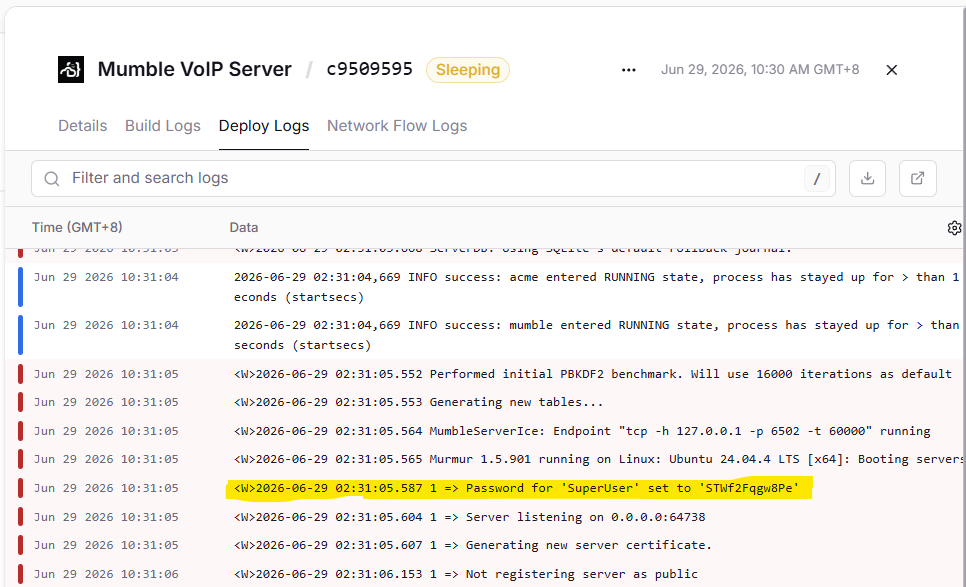
Pro tip: Save this password somewhere safe. You’ll need it every time you want to make admin-level changes to your server.
Step 3 — Find Your Server Address
Railway assigns a dynamic public address to your container. Here’s where to find it:
- Navigate to your Mumble service’s Settings tab
- Scroll down to Public Networking
- You’ll see an address like
reseau.proxy.rlwy.net:xxxxx
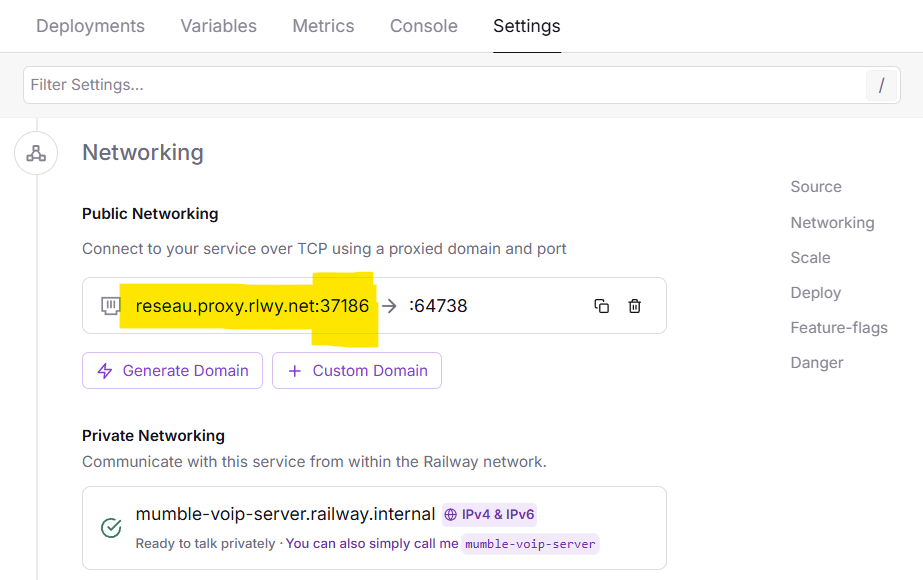
That’s your server address and port — enter both into your Mumble client to connect.
Step 4 — Connect and Chat
Download the Mumble client from mumble.info (available on Windows, macOS, Linux, iOS, and Android). Add a new server with the address and port from Step 3, and connect.
To log in as admin, use:
- Username:
SuperUser - Password: (the one from the deploy logs)
Once connected, you can create channels, register users, set up permissions, and configure the server however you like.
What’s Under the Hood
The Railway template is clean and minimal — based on the official mumblevoip/mumble-server Docker image. Here’s what matters:
Ports
| Port | Protocol | Purpose |
|---|---|---|
| 64738 | TCP + UDP | Client connections (control + audio) |
| 6502 | TCP | Ice RPC admin interface (not exposed by default) |
The Ice admin interface on port 6502 is intentionally kept internal for security. All admin tasks can be done through the SuperUser account in the client.
Persistent Storage
The template maps a persistent volume to /data inside the container. This is where the SQLite database (murmur.sqlite) lives — it stores your channel structures, registered user accounts, and ACLs. The volume ensures everything survives restarts and redeployments.
Without this volume, every redeploy would wipe your server clean. Don’t remove it.
After Deployment: Quick Setup Guide
Once you’re connected as SuperUser, here’s what to do first:
1. Create Your Channel Structure
Right-click the root channel → Add → name it something like “General”, “Gaming”, “AFK”. You can nest channels as deep as you want.
2. Register Your Regular Users
When a user connects for the first time, right-click them → Register. Registered users get persistent identities (public-key based), so they keep their permissions across sessions.
3. Set Up Permissions
Right-click a channel → Edit → Groups / ACL. Mumble’s permission system is extremely granular — you can control everything from who can speak to who can move other users between channels.
4. Share the Server
Send your friends the server address (reseau.proxy.rlwy.net:xxxxx), tell them to download the Mumble client, and they’re in. No accounts to create on a website, no email verification — just connect and go.
Advanced: Custom Domain and Scaling
Custom Domain
Want a cleaner address like voice.YourCommunity.com? Railway supports custom domains. Add a CNAME record pointing to your Railway service, configure it in the project settings, and you’re set.
Scaling
Mumble’s server is already efficient, but if you’re running a large community (100+ simultaneous users), you can upgrade your Railway service’s vCPU and RAM from the service settings. The Hobby plan gives you plenty of headroom.
Conclusion
Setting up a voice server used to be a rite of passage for anyone running an online community — SSH sessions, firewall configs, port forwarding, uptime monitoring. Railway eliminates all of that.
With the one-click Mumble template, you get a production-ready, low-latency, encrypted voice server in under two minutes. No DevOps experience needed. Your data stays yours. Your latency stays low. Your community stays connected.